EDIT 9/23/2016: If you want a far more comprehensive tutorial where I reveal information about keywords and Merch optimization click here!
Alright ladies and gentlemen. It is time to kick off 2016 with a tutorial that I have not seen anyone do yet. I posted about it on my 2016 goals post, as well as on Reddit and have had requests to get this written for some time now.
Initially I wanted to hold off on this till I had hit my goal of $4,000 a month by the end of the year, but I figure there is plenty of money to go around and room for everyone to compete.
Currently I am 1/10th finished with my goal with about 1-2 hours total put into this. To get you motivated, here are some screenshots from a friend who started 2-3 months before me.


What You Will Need
- Merch By Amazon Account
- Photoshop (or other photo editor)
- Creativity
What Is Merch By Amazon?
Merch by Amazon is the way that I decided to start a T Shirt company. You create designs, you upload those designs, and then they are sold on a print by print basis. There is no need to sell 10 shirts for the design to be printed or you to get your money. The great part of this is that there are no upfront costs, no overhead, and really no hassle at all. The absolutely best part of all of this is that Amazon has so many daily visitors that to achieve the numbers in the screenshot above, there was NO advertising done.
Before this program launched a few months ago, you would have to use Amazon FBA to send in shirts and you had no idea if they would sell or not. This costs money, and took a bit of guess work to get right. Now, you can just upload designs and see what is selling. You take a commission from the price of the shirt minus the cost of the base shirt from Amazon.
Let’s get started!
If you want to keep up to date with my progress this year with Merch and other Internet Marketing hustles, make sure to hop onto my email list.
Step 1: Sign Up For A Merch Account
Merch by Amazon was a massive popular program when it launched. Because of this, they quickly shut it down to new applicants and now you will have to wait for an invitation. Request one as soon as possible and just wait. Eventually it will open up, and meanwhile you can follow all the steps here so you are ready to start uploading by the time your account goes live.
Head over to https://merch.amazon.com/landing and request an invitation. This will prompt you to login to your account and fill out some details.
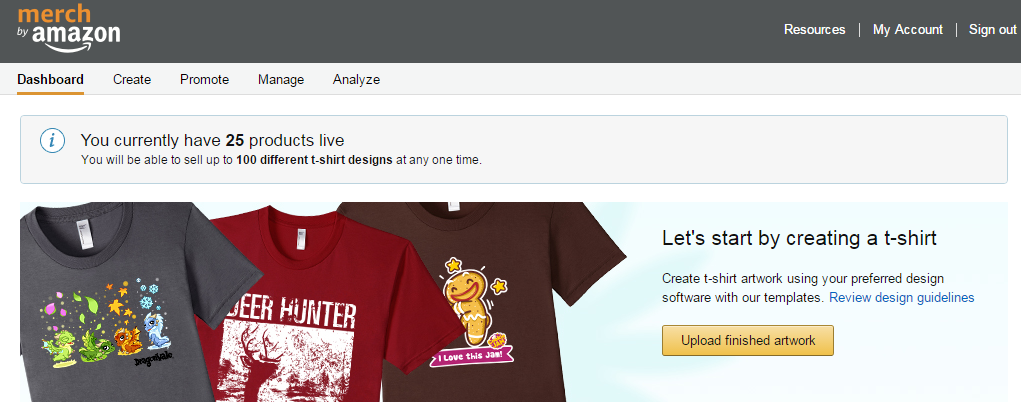
Once you are approved, you should be able to login to your account and see something similar to this:
Amazon Tier Levels
Please note that when you first get your account, you will be limited to 25 designs. There is a tier structure in place that works like this. If you submit 25 different designs, you will be capped there until you have sold 25 designs. If you have sold 25 designs from the original set you made, then they will bump you up to the next tier. So on and so on.
This was capped for me at 25 shirts for over a month because of how popular this program became in a short amount of time. I can imagine how much of an analytical nightmare this is for them.
Tier levels include:
- 25
- 100
- 500
- Pro (by invitation)
Step 2: Creating Your First T-Shirt
From your dashboard, click on Create from the top menu. This will bring up a page that looks like this:
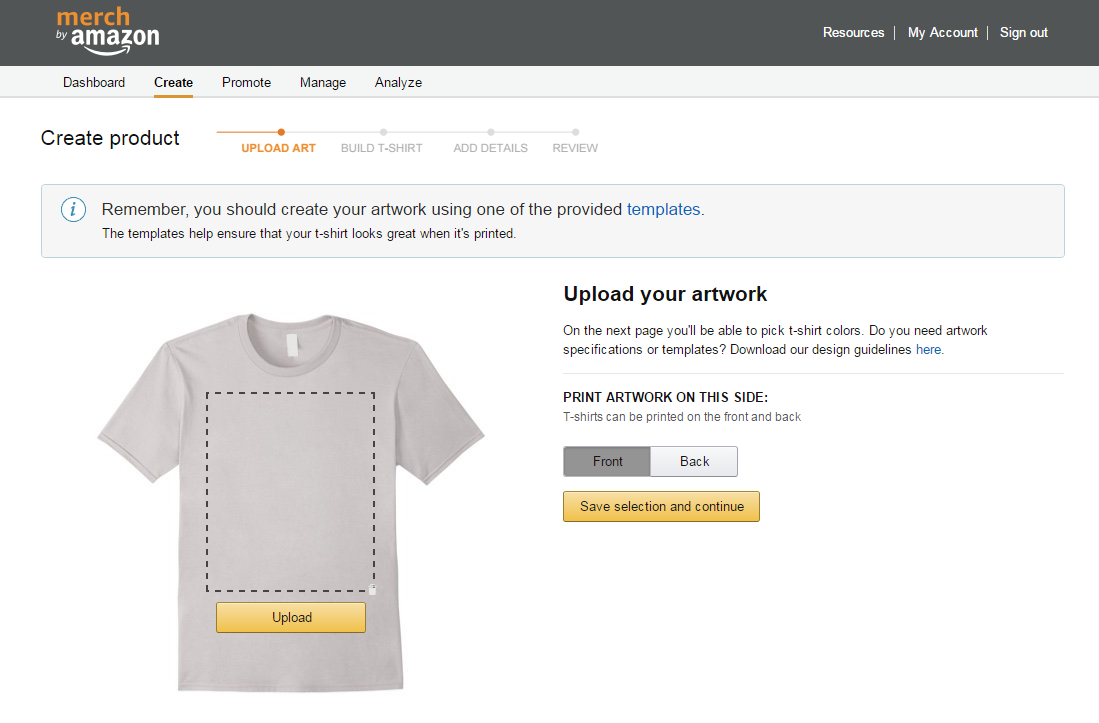
You will notice that they remind you to use one of their templates. It is very important to use these so the shirts print properly. Since the program is currently closed, I have uploaded them here so you can get started.
I use Photoshop, for this tutorial I will be using that.
Open up the template and it should look like this:
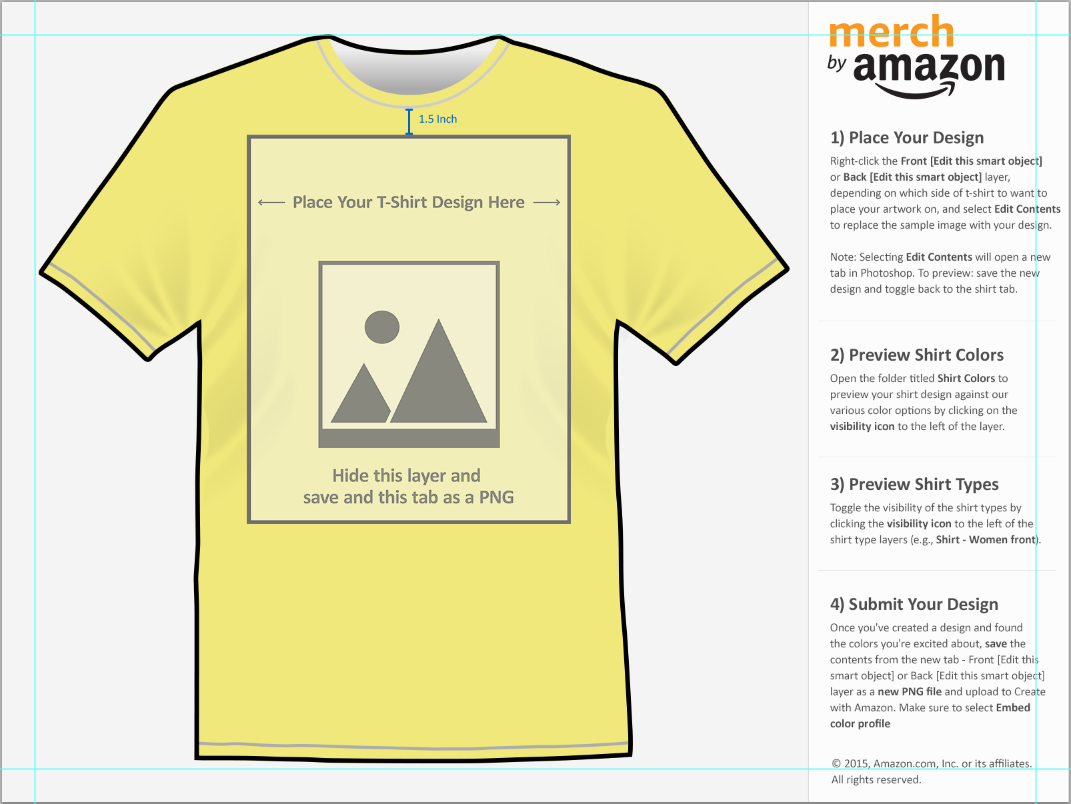
Simply follow the directions in the right side. For Photoshop CS5, right click, edit contents and then hit okay. It will bring up the design window.
Place your design within the borders and make sure it looks good. Be careful not to use small images because often when you scale them up, they will look incredibly pixelated. The window you will be working in will be scaled down under 20% of the size that you save it as.
I am certainly no designer, so here is a quick example that I will be using to upload and show everyone the process.
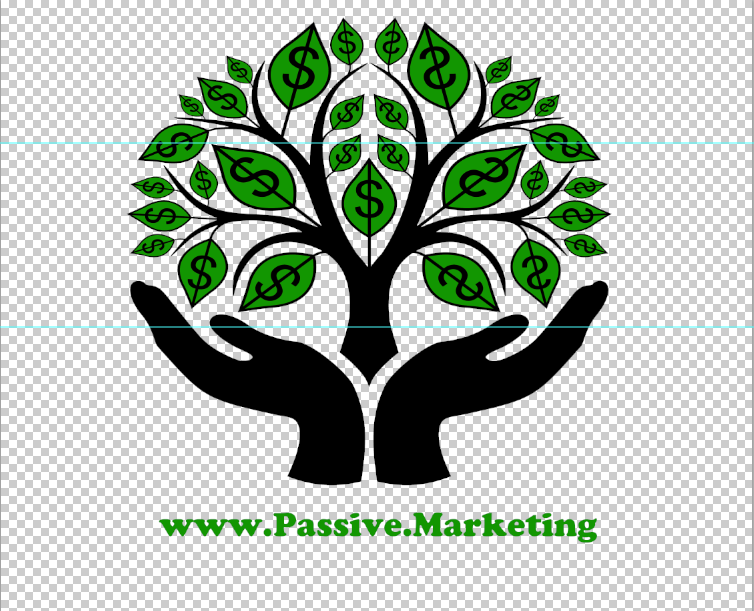
From here, you will want to save your picture. You MUST save your picture as a PNG.
Once you have your PNG image saved to your computer, you can return to the Merch Dashboard. Click on Create from the top Menu, and then click the button to upload your image.
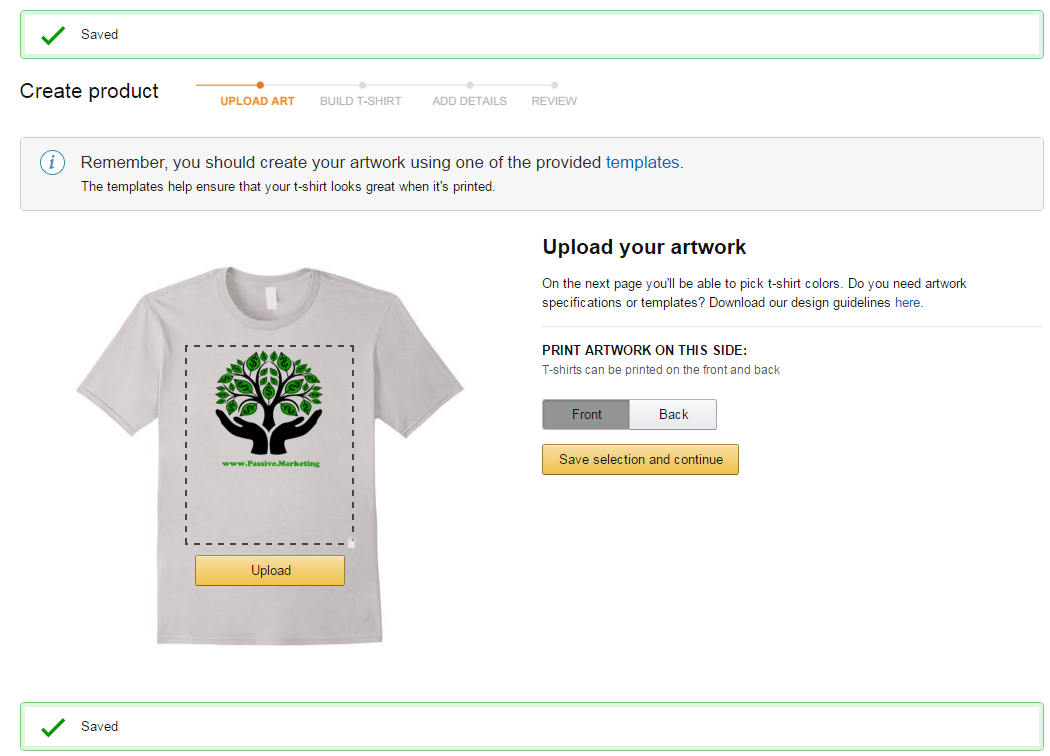
You are able to upload a front as well as a back to your T shirts. So far, I have only uploaded a single shirt with a back. The reason for this is that printing more than 1 side is going to use more ink, and thus your base price for the shirts will increase (netting you less commission).
From there, click on Save selection and continue.
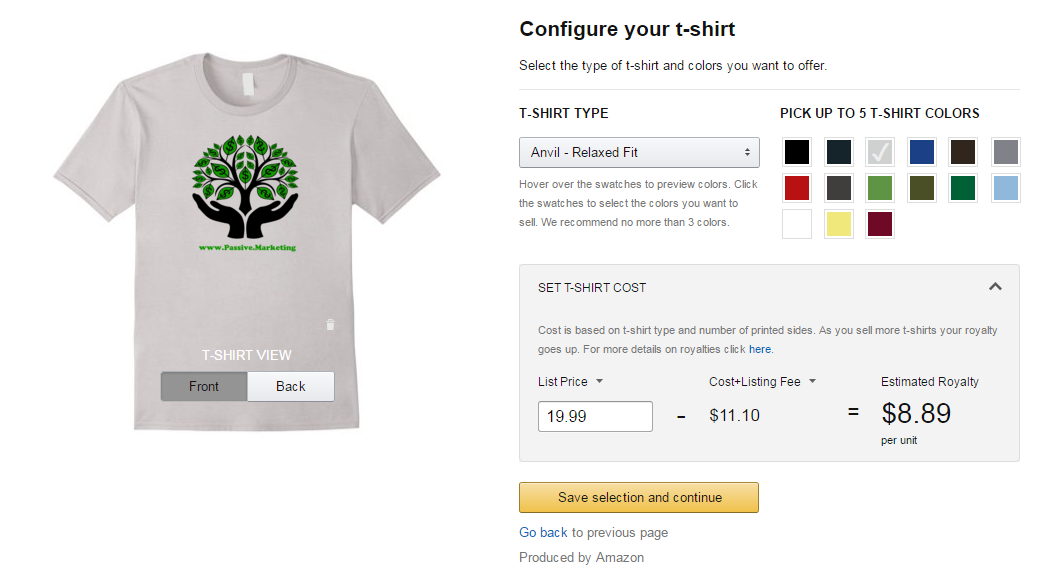
Here is where you will be able to see the different options for your shirt.
Under the drop down under the T-Shirt Type, you have two choices. Anvil – Relaxed fit, and American Apparel – Slim Fit. The first option will have a cost and listing fee of $11.10 as you can see in the screenshot above, and the American Apparel is going to have a cost and listing fee of $12.60. I always go with the first option because I want my margins to be as good as possible.
When was the last time you spent $20 on a shirt? Personally, I think that is an incredible rip off and I want to stay competitive. I generally will set all my shirts around $14.99 which is a much more attractive price. This will net me $4.64 for every shirt sold.
Not bad for a few minutes worth of work so far.
Pick out 5 shirt colors that your design looks good on, and click on continue.
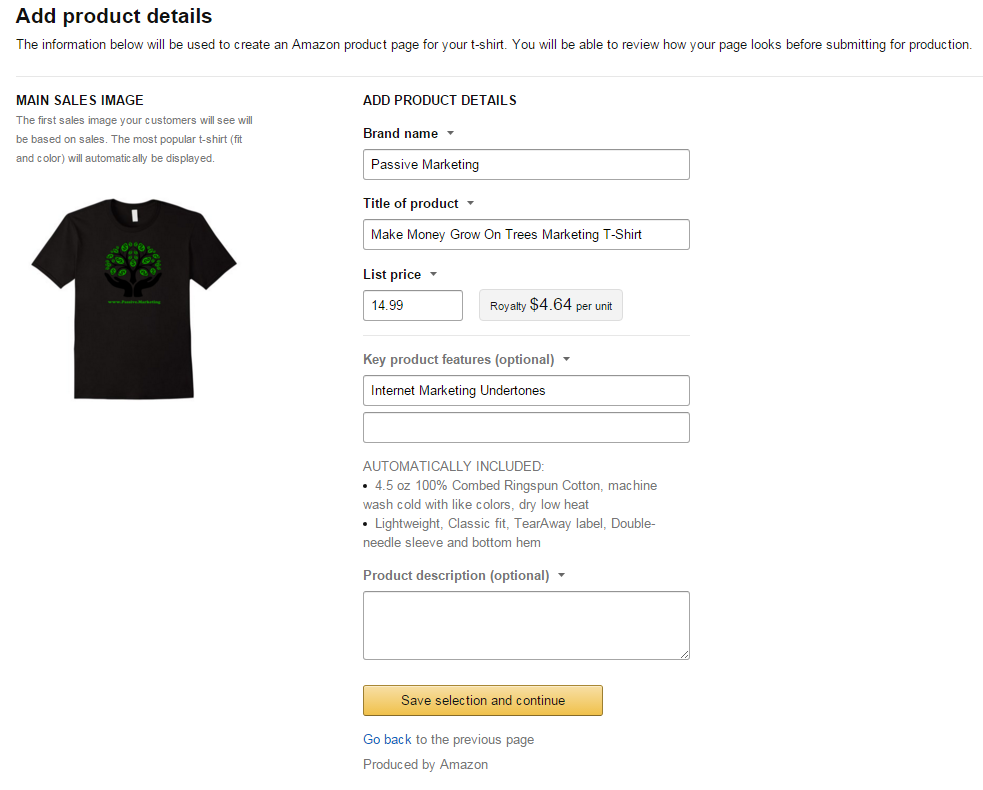
On this page, you are allowed to pick any brand name you want, title your product, take a look at the listing price, add product features, and a product description.
Key features and product description are optional. Both myself and the other people I know do not always fill these out. If you have a specific keyword you are going for, it CAN help if you add them there in a non spammy way.
Now that everything looks good, it is time to hit continue to the last and final page.
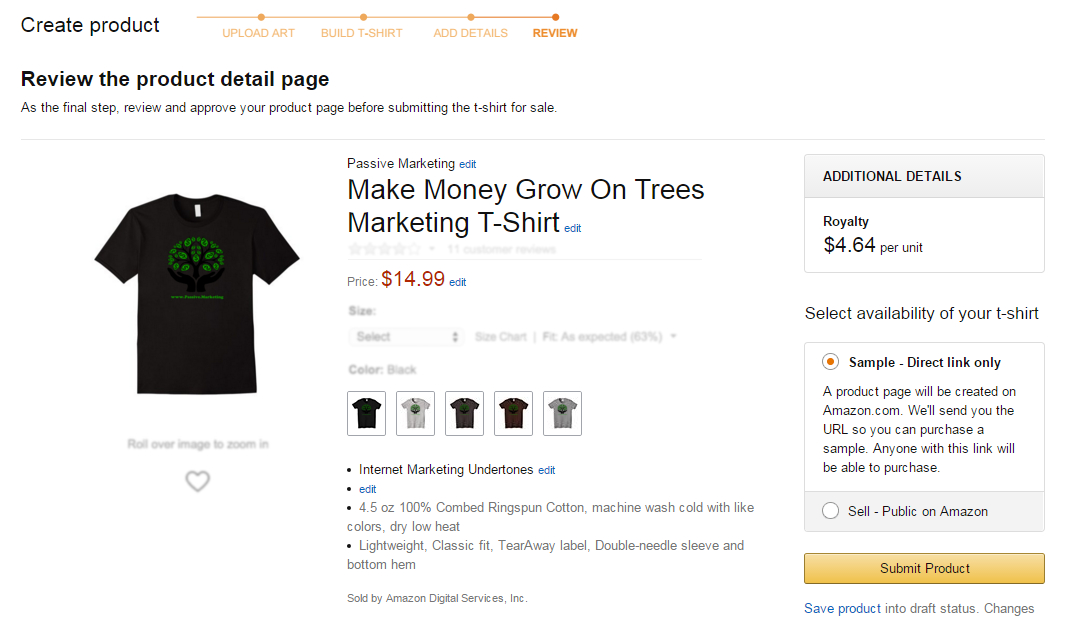
Review your work and make sure it is good to go.
IMPORTANT: On the right hand side, select the “Sell – Public on Amazon” radio button. If you do not select this, your shirt will not display in the catalog and no one will ever find it unless you personally give them a link.
When you are happy with the page, and the sell on Amazon button is selected, click on Submit product.

Congratulations, you have your first T shirt completed. The shirt itself will need to be reviewed by Amazon. After an hour or two, it should go live and become searchable for everyone.
You can see the shirt I just created here: Amazon Shirt Link
If you want to support this site, go ahead and become my personal billboard =).
Step 3: Finding Out What Sells
Now that the steps for creating and uploading a new merch shirt have been explained, we need to discuss about making the actual money.
Sure, you could create design after design, but how will you know if they sell? We need a more structured plan of attack here.
To find out what is selling, and find popular Merch by Amazon T-Shirts, you will need to become familiar with 2 things: Recognizing Merch Shirts, and Amazon BSR (Best sellers rank).
Finding Merch Shirts
I usually start out by typing some popular phrases into Amazon.com followed by “t shirt”. For this example, I used the phrase “do you even lift bro” + “t shirt”.
A lot of different shirts start to pop up. Clicking through a few of them, I found a Merch Shirt.
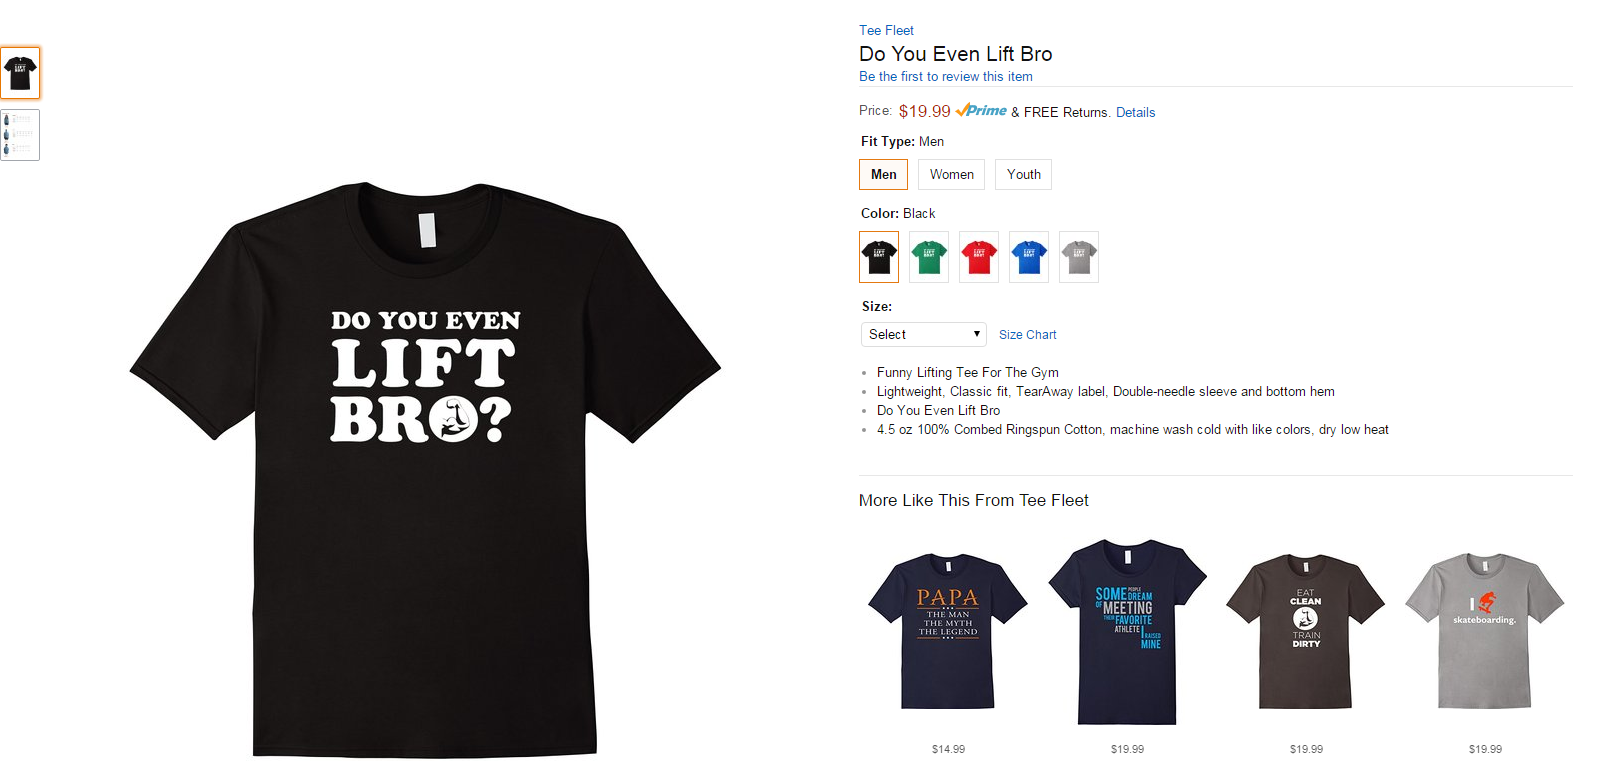
All Merch shirts are going to have the SAME thing in common and that is the sizing chart to the left. They look like this:
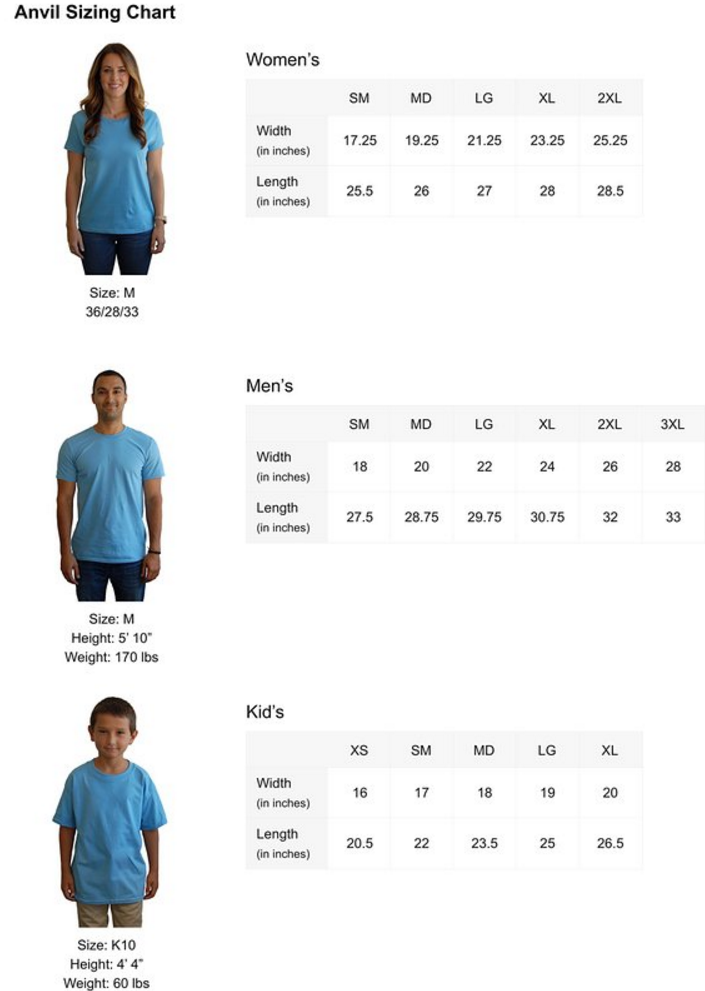
If you see this popping up, you can be sure you found a design that was uploaded through the Merch dashboard. This is a great place to designs.

By clicking on the brand name “Tee Fleet” I get a whopping 8 pages of Shirts that this person has created and uploaded under the same brand.
Just look at all those content ideas that you just found!
Understanding Amazon BSR (Best Sellers Rank)
Going back to the example of the “bro do you even lift t shirt” we just examined, we want to determine how well this product is selling.
To do this, scroll down on the listing to just under the product description. From here you will see a few details about the product, but what you are looking for is the Best Sellers Rank.
The lower this number, the more shirts are being sold. To give you a very rough estimate, if the BSR is at around #2,000-#3,000 that shirt is probably selling 100 of that design each and every day.

This “Bro” shirt is almost at a #400,000 BSR. This probably means he is selling 1 of this design every few days and it is not that popular.
I have found a good rule of thumb is that if a shirt is at or under #100,000 BSR, then that is a design that I may want to take another look at. Add these to a list and continue searching.
You do not want to straight up copy these designs, but instead use them for research and inspiration. This will tell you what your audience is interested in, and it up to you to provide them something of value (something they like and want to purchase).
Just from looking through this single persons shirts, I found this one: Papa The Man The Myth The Legend with a BSR of #121,000 at the time of writing this. This would be a great design to build off of to start.
Make a list of different designs you like and designs that you can tell are selling well. Once you have completed that list, its time to scale baby scale!
Step 4: Grow Your Business (Outsource!)
While I know a lot of you will be able to do simple text T shirts with funny sayings and such on them, sometimes you want more quality and something that is really going to standout. Perhaps you do not feel like creating shirts at all or simply are not familiar with Photoshop (I have a very very minimal understanding of Photoshop and have never used GIMP).
This means you will need to outsource your work. There are 2 great places to do this:
For Fiverr, simply head over to the site, type in something along the lines of “t shirt design” and you will see hundreds of gigs to browse through. A lot of people HATE fiverr, but there really are a lot of talented designers that hang out there. Keeping in mind that you will be making almost $5 commission for every shirt sold, you only need to make a sale or two to make up for the investment.
For Upwork, you will sign up, and post a job. Detail exactly what you want done, and people will apply to the jobs. I usually like to use Upwork if I have bulk orders that need to be done. If you have bulk shirt designs that you want to great created, you may be able to snag a designer for $3-$4 per design.
Send them the designs that you have saved after your research phase, and tell them you want something similar. Remember, we are not here to rip people off, we want to create something BETTER than what is currently selling.
Note About Copyright
Do not infringe upon copyright with Merch. It can be tempting because a lot of people are doing it and making some good money.
That being said, they will end up catching you eventually, and if you continually do it, your account will be banned and you will lose any of the money you have made.
I actually had a single shirt removed for copyright. I emailed them and was informed that the reason was because one of the sayings I was using was actually a trademark. I had NO idea.
To make sure you do not fall into the same trap I would highly recommend you check everything through Trademarkia.
Just be smart, do not use characters or sayings from popular TV shows or movies.
Where to find free images?
If you want to use images, you need images that are free to use and make money from. There are two things that I can recommend here.
- Open Clip Art
- Google “Free Keyword Vector” where the keyword is what you are searching for
Vector images can be re-sized without losing quality of the image. This makes sure that there will not be any pixelated trash in your designs. Always make sure that the license for these images is a Creative Commons License or similar.
Wrapping It Up
There you have it everyone! The full and complete tutorial for starting with Merch by Amazon and creating a passive revenue stream without too much work put into it. Remember that that more designs you put up, the more chance you will have of them selling. Always do your research to ensure that designs ARE selling and that you can provide more value to the people looking to purchase.
You will not need to advertise your shirts because of the massive amount of people who come to Amazon each and every day. If you were to find a design that was selling well, you could always advertise and just increase the amount you are selling. I have not tested this yet, but I would guess that Facebook ads would be a good way to start!
Good luck and keep up the hustle!




Awesome read as always. Sending this to my parents-in-law.
Awesome write-up Neil, would you happen to know the approximate wait time for an invitation from Amazon?
They have been very vague about when they will open up more spots. Currently they have said just to apply and when there is room available they will accept your application. I have a feeling once they figure out how to deal with the volume, it will open up again for everyone.
I signed up, fingers crossed for a speedy approval. I have a ton of ideas that I want to launch!
Please send an email notification every time you write a new post, I though I was subscribing to the blog but I never get any emails
I finished this post up at about 4am I believe. Just checked and the email was written but never sent out! Thanks for letting me know =)
Thanks so much Neil. Very interesting opportunity.
What happens if a customer is not satisfied and wants to return the t-shirt?
Who deals with that, Amazon or you?
Best regards
The great thing about Merch is that it operates just like Amazon FBA (fulfillment by Amazon). This means they handle everything. Returns and support are all on their side, all you have to do is upload designs.
Wow this is great, I have a LOT of designs but I was stuck at Zazzle selling 30$ t-shirts and making 2.5$ or less per t-shirt (it depends on currencies, referrals and discounts). I managed to sell 60 or so in total, most of them in December but It took a lot of work for such little income. And now you tell me that I can sell for 14.99$ and make 4.64$ per t-shirt… half the price and twice the commission, I’m going to design again
Thanks for sharing!
No problem! I think you should do well. Amazon has a MUCH larger audience than Zazzle has!
Any idea when they’ll be opening up the registration to new users? I’m incredibly bummed out that I couldn’t get started on this after reading the blog.
Go ahead and apply Derek. I know people have been telling me that they are beginning to accept applications. It even mentions it in my Merch dashboard that they have started accepting people, so it is only a matter of time before you get in!
Thanks u !
I registered but did not receive a response
Continue to check back daily. One of the people I know got accepted in 22 days.
do you trademark or copyright your designs Neil…??
I do not as most of them just use free images/sayings.
if I get a design done by someone,,,lets say on fiverr,,,is it now my design,,??
very interested in this…always wanted to do something with t-shirts…
Thanks..
Yes, if you are paying them for a unique design then you are paying to be able to use it.
ok this might sound dumb,,, so i need to purchase photoshop in order to use Amazons templates,,??..or is there something free I can use..??,,,Thanks
I did this tutorial with photoshop because that is what I had. In the article I provided a link to the GIMP template and you can also use that. Cheers!
Hey thanks Neil..I tried Gimp…cant seem to open the template…ill try again i guess
Thanks for the quick start guide! I just got my invitation and this post helped me get some t’s up pretty quick. Just a few questions…Does Amazon add keywords to our listings? It seems weird that we don’t have a place to add them. Also, you mentioned there is no need to market because of Amazon’s massive customer base. Have you or your friend done any marketing to get to the sales you guys have in such a short period? If so what venue do you find works best?
Hi Lisa! For Amazon Merch, they do not add keywords to your listing. If I want my shirt to rank for a certain keyword, I will place the keyword in the title, and then in the bullet points or the description, I will generally insert similar keywords and that seems to be working pretty well. Neither me nor anyone else I know doing Merch have actually advertised! I am up to 110 shirts sold this week and have not ran any ads or anything. This is something I plan to look into in the future. I have seen some merch sellers running Facebook ads, but I have no idea if this is even profitable. Best of luck!
I realised this is for game makers and creators , now am wondering can people like us who would want to promote our cultural sysmbols take part ?
Of course! I am not a game maker but am uploading my designs and doing very well. It puts shirts on Amazon and they have a prime option so really it is for anyone with designs.
Thank you , well i applied in march , and till date i have not heard from them.
I think i should give up. Any other money making venture you recommend? Neil
Hi Neil,
Thanks for the guide.
Got my invitation today so will be researching tonight.
I see Amazon are increasing their costs by, I think, $1.21 per t shirt. Will you be adjusting your price out will you be absorbing this increase.
I think mine will be selling for $17.49 initially, but will test.
Thanks again
Phil
Hey Phil! Ya, they did increase they base price on the shirts about 15%. What I have noticed is that all my shirts that were uploaded before this change are still receiving the same commission. Any new shirts I upload get 15% less. Therefor, I am only increasing the prices on the newer designs. So far, this usually means I am testing out the $15.99-17.99 price points and seeing what works!
Wonderful post, I got approved for the program today only so I am hoping I can make some good designs and get sales. I have been working at zazzle till now. There is one thing I wanted to know, you said we should google “free keyword vector” for finding the vectors. So, I googled ‘free wedding vectors” and reached freepik.com, but there they are asking for attribution which is not possible perhaps on Tees.
Is there any site which doesnt require attribution, kindly share.
Thanks for this post you made my work so easy
You really have to search around for free vectors that do not require attribution. You can put where you got an image from down in the description but since I would rather not, I just search around or create what I need myself. I have since moved on to hiring designers from upwork so I am not longer creating designs myself. Good luck!
Love the tutorial! I myself have been doing merch for about a month or so. Haven’t even got my first payment yet.
If you don’t mind me asking, how many shirts have you uploaded to reach 100 sales a week? And what seems to be the sweet price point for you?
I currently have about 163 shirts up. Should have a about 100-200 more in the next week or so. The sweet point seems to be around 14.99-15.99 but I have shirts priced less than that, as well as higher. I have noticed that merch seems to be really up and down. One week I might have a shirt that takes off, and then dies off just as fast.
Hey Neil
Put in my application about a week ago but still haven’t heard back. Any insight as to whether this is sign of rejection of my application or is it just a waiting game?
Hey Nathan! At this point they are a bit slow on approvals because they are trying to keep up with the demand. The people that are getting accepted have had to wait about 1-2 months.
Hj.
I registered 2 weeks ago, but I still have not been amazon approved.
Can you help me?
Thanks.
From what I am hearing, it is taking 1-3 months to get accepted currently. Just keep waiting and keep your fingers crossed!
Hi You !
Thanks for your article
I have just registered,
You can share tips register.
Thanks !
Hi Neil
Can you made a video guide to sign up for everybody?
Thank for your this post
It is a super simple process that takes 5 minutes to sign up. It does not really matter how you sign up, just do it. The issue is that Amazon cannot keep up with demand currently so getting accepted is nothing but a long waiting game.
Lot of thanks for shearing great information.but i will requested for invitation for me .but i can’t receive any invitation from merch.amazon.would you please tell me how can i get account from merch acoount.
thanks By Saddam
Hey Saddam, you will need to apply with your email and then it is just a waiting game. Currently people are waiting over 3 months to get accepted so just hold tight as Amazon figures out how to handle the volume.
Great tutorial! Would mind explaining how you create/created the designs when you did it yourself? Do you find free stock images and combine them into one, or is there some particular technique that a photoshop noobie can follow? Would be interesting to know.
Also, say that you found an image online that is free to use for commercial purposes. Would you use it just like that without editing it all? I mean somebody else might be selling the exact same t-shirt with the same logo?
Once again, thank you for the work!
Best wishes,
Victor
Hey Victor!
If you are accepted into merch, they give you a template you can use. I would simply open that up in Photoshop which I am terrible at. I would then use free vectors if I would find them. All of my first designs were simple and combined some form of a vector and text. I would switch up the text, and maybe color in the images to make them unit. I like to make my listings unique in some way so I do not have issues later on.
Thank you for the reply!
Thanks so much for your insight! Do they usually send you an email when you’re approved? Thanks , liz
I have heard they are sending out emails, but others I have spoken to said they did not get an email and just tried to log in one day and were accepted. Keep checking back daily.
Awesome article. Couple q’s:
1) When you signed up – did you put a personal name for “Organization Name”? Wonder if they are not counting individuals..
2) Is there a limit to the accounts created? For example… each family member having their own..
I did use my personal name and not my companies name when I signed up. And no, there is no limit on accounts created so each family member could have an account.
One more update to this question… could you link to where it says multiple accounts are ok? The only thing I can find is the Prohibited rules of having multiple seller accounts and horror stories of family members logging in from same home computers/IPs to have accounts banned.
I did apply though – here’s to waiting.
I think they are okay with multiple accounts in a family. That being said, let me see if I can dig it up: https://webcache.googleusercontent.com/search?q=cache:V6qVOhInazQJ:https://forums.developer.amazon.com/questions/20435/helping-family-member-with-their-merch-account.html+&cd=1&hl=en&ct=clnk&gl=us. If you cannot see that I will copy paste the response from the Amazon rep: “You are welcome to help your family member using the same computer to upload designs and log into your account. You are also welcome to use the same bank account to receive royalties. Thank you for helping out another member of the Merch by Amazon community! Please also point them to our FAQ for any questions they have and please continue to use our forums for information sharing and great questions just like this one.”
Ah interesting. I spent a few hours looking and searching and didn’t come across that one.
Also tried to figure out a way to easily capture the top “xyz” # products by sales rank in a certain category… still working on it though. Will let you know if I figure it out.
Found a chrome extension that displays the SR while browsing.
Wow, nice post.
Can you share some tips to get Merch approve ?
I have submitted but still not approved
All you can do is wait. The good news is that they just started approving people again.
Hi Neil, i’m newbie I have a question about register Merch.
This image:
http://i.imgur.com/uujJ6D0.jpg
With website và additional information, if i don’t have any website and just register with organization name and industry type, is that ok to approved? please tell me. Thank u so much
Yes that is fine. Just fill out the information you can and you will end up waiting.
What will we write to Additional Information box?
Anybody can help me?
Thanks for the nice post.
Please, I need to know how one gets paid after making sales on merch. Thanks
For people in the USA you can do direct deposit. Go to your my account tab and then payments and banking on the side to add an account.
Hi, I can not find bank account in my country to get pay, can you help me . Thanks
Great walkthru here. Keep sharing this great content.
I am not exactly sure as to how to go about promoting my T-shits after uploading them.. Can you please help?
I actually wrote a good article about that here: https://merchinformer.com/leverage-pinterest-marketing-sell-merch-amazon-t-shirts/
Hey
Great Article
Can you please help me what to write in the Additional Information box?
Thanx
When I applied I just put any web properties I had where there was an audience.
Thank yoy for such an informative post! I would like to ask though, Can you sell on merch even if you are not a US Citizen? I am a filipino and would like to give this a try. Thank you for replying in advance:)
You sure can! Everyone can sell on Merch once they get accepted.
There are tutorial, check out trademark did not your.
What was that?
Hello, how are returns handled with Amazon merch? If a customer doesn’t like a shirt that is printed for them, does Amazon allow them to return it? Printiful, for instance doesn’t allow returns for wrong size shirts etc. which leaves the site owner in a tricky situation.
Thanks
Merch by Amazon returns are handled by Amazon. You will not be involved at all. If you are doing the Shopify Method that was wrote about on MerchInformer.com, you will need to either just refund the customer and let them keep the product, or have them return it to you. If you are in the USA this is easier and if not, set up a forwarding service.
Just want to make sure, can i do this as well even though i am in Canada? Will it be as long to be accepted? Thanks, great tutorial!
You can absolutely do this in Canada.
Incredible guide! A few months ago I started learning how to design t shirts, and I learned all the necessary steps by following this guide: http://www.coreldraw.com/en/pages/sell-t-shirts/ It all started as a hobby at first, but now, I am thinking about earning some money out of it, but I had no idea where to start. Thank you very much for this guide, I found it very helpful and informative. I am ready to make the first step!
Hi Neil,
Terrific article and I’m ready to roll! Can I ask whats your opinion on the Copycats? I hear the new Teespring Integration with Merch means thousands of copycat designers are now free to display their stolen designs on Amazon?
Any tips?
I always tell people to focus on them and their own business. Keep designing and putting up your designs. The copycat problem will get better with time.
Thank for great article Neil, But how did I know Quote that i find in internet are free to use.
Look up those phrases on USPTO and TESS to make sure they are not trademarked.
Neil, how are you? You are being fantastic in helping everyone!
I am Brazilian using the google translator to communicate in your language, and I would like to know if I am going to register for Merch by Amazon, I need to buy an American postal address to be able to register and have a better chance of getting the convie In Merch Amazon or I can use my address here from Brazil in the realization of my registration and if yes I will not have future problems?
Thanks in advance!
Nope. You can just go ahead and sign up with your own information. If you are looking to get a US bank account, check out payoneer.
How long it take to get approved by Amazon?
A few weeks to a few months.
It took me and two other people I know 6 months to get in the program. Now its 10 shirts to start out with.
Hi, just stumbled on this and am really interested i hope i am not too late and i hope i will receive a feedback. my question is can anyone from other from other country be a part of this especially Africans. If this is possible, how will the payments be made and hope there won’t be issues around taxes. Thanks
Yes you can sign up and make money with Merch. Simply get a Payoneer account and you should be good to go.
On your tutorial, the screen shot of when you uploaded it to your dashboard looks like you have your artwork set to print in the top 2/3’s of the 18″ tall template. I have set one of my designs up in illustrator similarly, however, when I upload mine, it centers it top to bottom every time instead of printing closer to the top. How can I fix this?
I really just drag and drop the artwork/design to the top of the MBA template and then save them. I no longer make my own designs though, so I am afraid I cannot be more specific.
Amazon requires you to have tax clearance to gey cleared for the program. How do you achieve that being a non-US citixen
You can use an EIN: https://merchinformer.com/avoid-30-tax-witholding-non-us-amazon-sellers/
I signed up, fingers crossed for approval faster I have a ton of ideas that I want to launch!