
I am sure you are aware of the latest craze of the private blog networks. Why are they so big nowadays and why is everyone talking about them. They work. Period! It is simply the best way to take control of your tier 1 links and dominate the SERPs. If you have been thinking about building your own PBN then this is a great place to start.
You are aware of everyone’s advice about how to build one. Grab some expired domains (or pay for non dropped domains is probably your best bet), set each one up at a budget host, write unique content… and so on. If you want to run a small to medium size network, the expenses can quickly add up for the hosting costs and it is nothing but a pain to control so many hosting accounts. If this is what is keeping you from building your private blog network, you are in luck. No one else is going to tell you how to do this. Why? They want you to go out and buy hosting from their affiliate links to make THEM money. I am going to show you how to do it for FREE.
If you want to skip this process and just have someone host your PBN for you, check out https://priorityprospect.com/services/seo-hosting.html.
Introducing CloudFlare
![]() At the very basic level, CloudFlare is a reverse proxy hosting service which just so happens to be free for our purposes. If you are thinking about using a free service for your PBN, just keep in mind that CloudFlare has raised over 50 million dollars in investment and is one of the biggest content delivery networks out there. They even directly compete against Amazon AWS.
At the very basic level, CloudFlare is a reverse proxy hosting service which just so happens to be free for our purposes. If you are thinking about using a free service for your PBN, just keep in mind that CloudFlare has raised over 50 million dollars in investment and is one of the biggest content delivery networks out there. They even directly compete against Amazon AWS.
The primary reason for this service has absolutely nothing to do with building a network. The service is actually designed to speed up websites and protect them from DDOS attacks. They do this by putting a proxy in front of your actual IP so that if someone wants to DDOS you, they will have no idea which server you are actually on, thus making the attack ineffective. Think of them as a firewall between you and the attacker. It just so happens they make an excellent firewall between you and Google! Did I mention that the type of account we need to do this is FREE? I do not need your hosting commissions, I just want to give you info that works.
You may be wondering to yourself how big their IP range is. They have over a million IPs which include hundreds of Class C IP addresses so if you are doing just a small or medium size network, this should certainly be enough to get started. The best part? You can pack all your domains on a single server and let CloudFlare do the rest. Even from your budget host you pay less than 5 dollars a month on. How is that for money savings?
Sidenote: I am only focusing on Cloudflare in this article but there are other services that can be used as well. These include Incapsula (free) Rocket IPs (cheap) and Amazon CloudFront.
Second Sidenote: I am aware that all Cloudflare IPs linking to one site may leave a footprint. This is why I recommend that you diversify your link profile like you should be doing anyways. There are millions of sites that use CloudFlare, so I believe this to be safe.
How To Set Up Your CloudFlare Private Blog Network
Step 1: Go sign up at Cloudflare
When you sign up, you will see a box that says “Add a website”. Simply put in the website you want to run through this service.

It will then scan all your DNS records for the site you have put in the box. The results should look a little something like the picture below
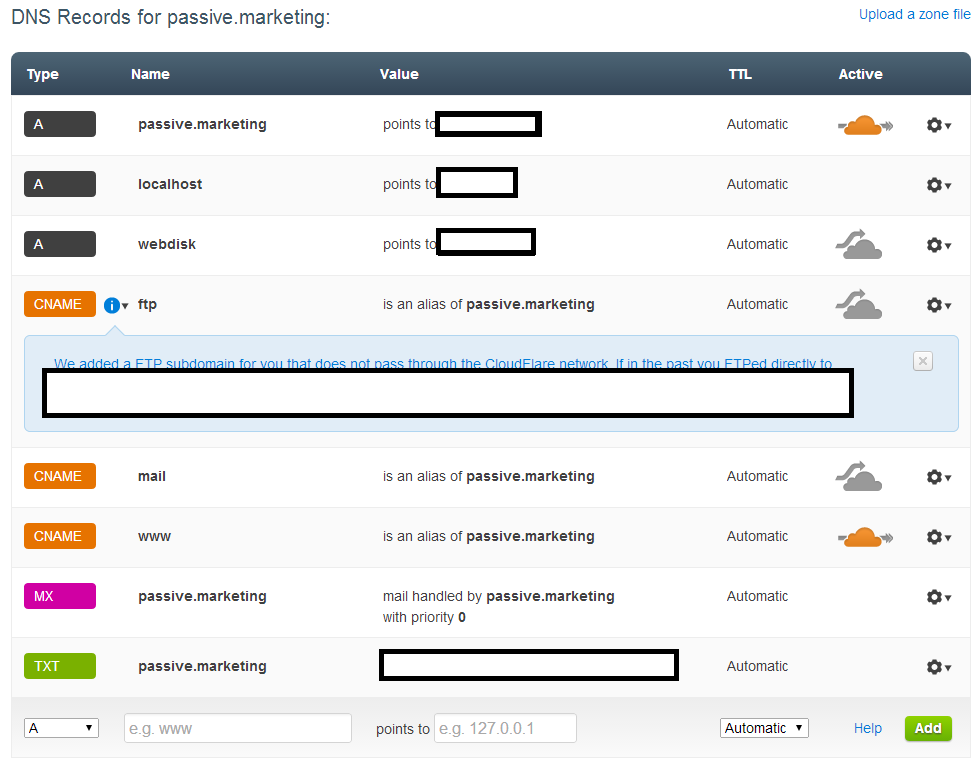
Step 2: You want to keep this simple? Good, me too. Delete them ALL. You will not hurt anything as you will add a few things back, just get rid of every record on that list.

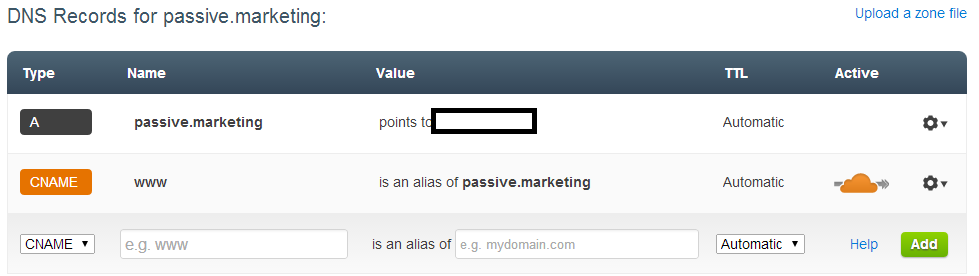
That is better, all gone. Now is where you are going to add back a few things.
Steps for first record:
- Select A for the first record.
- Enter your domain without the www.
- Enter the IP of the server the domain is on
- Click Add
Steps for second record:
- Pick CNAME
- enter www and nothing else in the second box
- Enter your domain without the www
- Click Add
When you are all done it should look something like this:
Go ahead and continue at this point and pick the free plan and set security to high.
Step 3:
Next it will give you nameservers to switch at your domain registrar. They will look something like this
- frank.ns.cloudflare.com
- becky.ns.cloudflare.com
There are over 50 different name servers. Make sure you write this one down somewhere and you are officially done with the Cloudflare process. The only thing left is to go over to your domain name registrar and switch these out.
Forward DNS to Cloudflare
I use Namecheap for the majority of my domains so follow these steps to get your DNS to route through CF.
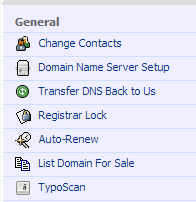
Step 1: Login to Namecheap and find the domain you want to change the name servers for. Once you have the domain selected, you should see “Domain Name Server Setup” in the left corner.
Step 2: Once you have that selected, you will see this. Click on Specify Custom DNS Servers and enter in the ones that you wrote down earlier from CloudFlare. Save these and you are done!

Congratulations. You are done with the first domain in your Private Blog Network. For each domain you have, sign up to CF with a new email. You will have to be REALLY unlucky to get the same name servers in a row which has never happened to me.
I have had nothing but amazing results in some of the small niche relevant blog networks I am running like this and they have remained safe and under the radar even though all the domains are packed on a single host. This might not be the very best way to set up a private blog network, but I can tell you from first hand experience: it works!

Awesome read Neil! Cloudflare is booming it seems.
Thanks for making good tutorial. I have sent you a question via contact form.
I have just responded to your email. Cheers!
I have a question:
if I delete all records initially and then I should: “Enter the IP of the server the domain is on”
Where do I get this IP from? From the registrar?
Thanks for clarifying
Yes, that is the IP of your webhost where all your website files are located, not the domain name registrar.
I got another issue:
after deleting all the posts I get a message:
No MX records found for your root domain, xxx.com. With CloudFlare, an MX record is required for mail to reach @xxx.com.
Thanks
Will it allow you to go past that? Yes, mail will not be able to reach you, but this is essential if you want to keep your network safe.
Can you explain this a bit more? Why mail needs to be removed?
Because if you keep it, that is a footprint to the server that the site is on.
The problem is that you have a major footprint in the nameservers, you need to setup your own nameservers are else you’re network is easy to spot
Dave
I am going to disagree, thousands and thousands of websites are using nameservers from cloudflare. Keep your network small, along with other link building, and you shouldn’t really have an issue.
Quick question – can you install wordpress directly through cloud flare or if not how is this done (usually install WP through host)
Thanks
I typically throw it on my web host, install wordpress, design everything and put up my content, then ill change it to run through cloudflare before anything is indexed.
Hi Neil,
Interesting article. Although written almost a year ago, the strategy still makes sense, or?
My main questions are: How many websites should be hosted per PBN on CloudFlare at most? How many PBN’s? When does it make sense to use another service, such as Incapsula to reduce footprints? How many sites can be established per day , week or months using CloudFlare? I can imagine you don’t want it to do all the same day? 😉 Perhaps another question may be, how many accounts on Cloudfare are recommend or make sense in regards to PBNs? Please let me know.
— Rainer
Hi Rainer. I still have my entire PBN going through Cloudflare and it has never bit hit. I feel like you can have a lot of domains going through cloudflare as long as you are getting new C class IPs each account you make. You also will have different name servers and they do not have as many of those. As long as you are getting unique IPs and do not have too many links pointing to your site having the same cloudflare name servers I think you are pretty safe. You will have to make up your mind as to what is the safest option for you.
As for how many you can do in a day. I always put up a pbn as soon as I get the domain. If you want to do a lot of them, you can put them up all at once but I would not LINK them to your money site right away, do them in small batches. For your last question, I use 1 free cloudflare account per domain.
Hope that helps,
Neil
Hi Neil, i’m NEWbie and i Just have 1 MNS, so how many cloudfare i can use for PBN?? Should 2,3 or 4 !! Thanks
You should use one cloudflare account per PBN site.
Hi Neil,
Nice read. Can you please tell me how many articles I need before on my PBN site to start linking on my money site. Another question, What kind of layout you recommend? All posts on homepage or create inner pages as well?
Thanks
Hey Matt,
There is no set amount of content you need on your PBN before you start linking out. I tend to make actual real sites on my PBNs so this means I will throw up all the old content that used to be on the domain. In a lot of cases this is around 100k words. You do not need to do this and 10-30 articles is probably fine. The more legit you make the site, I think the safer you will be. I create inner pages as I do not like everything on the main page. What real site does that?
Hi Neil, I have started a pbn using a few expensive old domains – I figured it is rather tims consuming and I didn’t want to waste my time with original handwritten content on inferior sites. So I’m going out with bour $US400 each domain and tacking them onto unique indivdual hosting and then rebuyilding the original sites as much as poissible – even making interior pages match the url of the best links from the highest authority sodomains so there is no 301 or 404 redirect.
I might use cloudflare for one or two sites – would you recommend this?
Thanks
Bren
Hey Bren! It sounds to me like you are building a PBN like they should be built (real sites that offer value to readers and actually gets traffic). My personal network is extremely small as I much prefer more white hat link building techniques lately, but this is how I built mine.
If you are spending so much per site and they are large, then I think you would be better off putting them on their own hosts (not cheap SEO hosts). That being said, if you did want to run a few of them through cloudflare I believe you would be safe. It is up to you, but if you are going to be spending so much per site, I would go the extra mile and put them on real hosts.
Thanks for this Neil, I appreciate articles such as this one.
For the uninitiated, could you link to another article that actually describes how to purchase and set up the domains within the network, in the most layman’s (and least wordy) terms possible?
I remember Viper Chill wrote something on PBNs a few years ago, but it was far too lengthy and over my head.
Regards!
I really do not have anything about this. But once you have the domains, (http://www.passive.marketing/buying-deletedexpired-high-pr-domains-for-their-backlinks/), then all you really need to do is follow the article above and get them set up with wordpress and some content.